Saturday, December 15, 2012

Office Makeover

Our office was in desperate need for a makeover! Here are some {embarrassing} photos of what it looked like BEFORE. Stay tuned for a variety of projects, and then, of course the {looks pretty good if I do say so myself} AFTER photos!

Ugly and messy

Yikes, what was I thinking with that accent wall!?
I admit, I painted that {hideous} green accent wall. It was in my "I have a house! I want to paint! I don't know what I'm doing!" phase.

Stay tuned about the office, and better yet, I little project I'm debuting tonight at my Staff Holiday Party...I can't wait! :)

Thursday, September 27, 2012

Getting Through This Together

It has been a rough month. For many reasons, of which I won't go into details. But, the lyrics to this song, by He Is We (one of my new favorite artists) have been an encouragement. I am so thankful for Tom and this song is a wonderful description of how I feel about being thankful to have him in my life! I could listen to it over and over again and never get tired of it. Then again, I am one of "those" people who can listen to a favorite song over and over again. It drives Tom crazy!

Listen here:

Enjoy!

Saturday, September 8, 2012

Wishing for the Beach

Back in early July, Tom and I had the pleasure of going to Orange Beach, Alabama with my family. We had so much fun, and really enjoyed relaxing, eating amazing food, and being with dear family. I love the beach. I love falling asleep while reading under an umbrella, swimming in the waves, and walking the beach each evening. We had an extra treat of being there over 4th of July. Watching fireworks over the ocean while laying in the white sand was a definite highlight! Here are a few pictures of our trip:


Wish we were there now!! One week flew by and wasn't long enough!

Monday, September 3, 2012

House Work

We've been so busy with the back to school routine and working around the house. Here are some big projects we can finally check off our list!

I painted all the trim white, and the banisters white, too. I love the new look! Also, we finally painted all the downstairs walls and the foyer. It makes such a big difference!

Windowsill BEFORE
Windowsill AFTER
Wood banister BEFORE

White banister AFTER
White walls BEFORE
Beige walls AFTER 
Tom has been working hard, too! He ripped out dry rot, replaced the wood on both our bay windows, and put in a new back door!
Dry rot all ripped out!
A big mess
Working hard
I wish that was everything on our to-do list! At least we checked off a few items!

Monday, July 30, 2012

Summer Depression

Summer is almost over. And by almost, I mean, officially after this week. In the 4 weeks that I actually had a summer, I have worked at school/on school stuff and/or tutored for at least 12 of those days. So, really, "summer" has been over for some time.

I'm trying to live it up this week by:
-finishing painting all the trim in the house
-read Pride and Prejudice (I'm about 1/4 of the way through)
-do all the laundry
-go to the pool to get somewhat of a summer tan
-clean the house top to bottom
-finish setting up my classroom
-watch the Olympics (highlight of my week for sure!)
-organize the basement
-play with Mag-ster

Wish me luck! :)

Monday, July 9, 2012

Where I've Been, What I've Been Doin'

Life has been BUSY. Since my last post, I:

*Completed my Masters Summer Practicum (which included finishing a ridiculous amount of work, but with the exception of a final presentation, it is DONE!)

*Celebrated my wonderful co-worker, Danielle's Wedding (gorgeous. perfect. loved every second.)

*Talked to my sweet Cottage Friends who celebrated Jen's wedding in Michigan (I could not go, devastatingly, due to the event below. Pictures show it was the cutest wedding ever. And Jen looked beautiful!)

*Went on a fabulous Family Vacation to Orange Beach, Alabama (Drove 14 hours both ways! Pictures and update to come!)

*Attempted to update my house for under $100 (which I mostly followed, more to follow, of course.)

And now, here I am! So much to do! So little time! Today was really my first free day of summer and it was amazing. I have to kick it in high gear tomorrow, to fit in all my projects, and hopefully a bit of fun!

Monday, June 18, 2012

A Puppy Birthday

Happy Birthday to our sweet puppy dog Maggie! She's three! We are so glad we decided we were ready to get a puppy dog three years ago!

What a pretty party princess! She hates us.

Opening her present.

A dog cake...and no, that's NOT chocolate!

Maggie devoured this in about 5 bites.

The Life.

Some serious chewing!
Happy Birthday Mags! Here's to many more puppy birthdays!

Saturday, June 9, 2012

Adding a Little Chalk to Our Lives

I've been wanting to do something about the garage entrance to our house. I'd love a mudroom, but considering you walk into our house and head straight into the pantry/the refrigerator/hit a wall, there ain't much room to work with! So, I thought a chalkboard wall might spice things up a bit, without taking up much space. I wanted the color of the wall to stay the same, within the chalkboard part. Since the kitchen wall is Eggplant, I thought black would look strange next to it. I looked on Pinterest (of course) for some inspiration and make-your-own chalkboard paint recipes, and I found this website/blog to be the most helpful.
http://thedecorologist.com/wp/dont-use-chalkboard-and-magnetic-paint-until-you-read-this

I still had many questions while working on the project [What color grout?, How much paint do I need to make? How many coats of paint is best? How long do you sand?], and it was hard to find a comprehensive explanation that answered all of them. I hope to provide clear step by step directions for you!

How to Make a Colored Chalkboard Wall:

Supplies:
Tape Measure
Plumb line
Level
Painters Tape
Paint
Un-sanded or Non-sanded Tile Grout in White
Paint brush
Tarp
Chalk
Sand Paper-medium or 100 grit
Trim-3 pieces of normal trim/baseboard
Trim-1 piece of large trim to create ledge
Nails
Hammer
Wood glue

*Disclaimer on the pictures: This is a very small, awkward, dark part of our house, so I had a hard time getting the lighting right. Also, the purple doesn't look Eggplant, it looks very bright. It's not, please don't think I have a ridiculously purple kitchen! :)

Directions:
Step One: Getting your surface ready
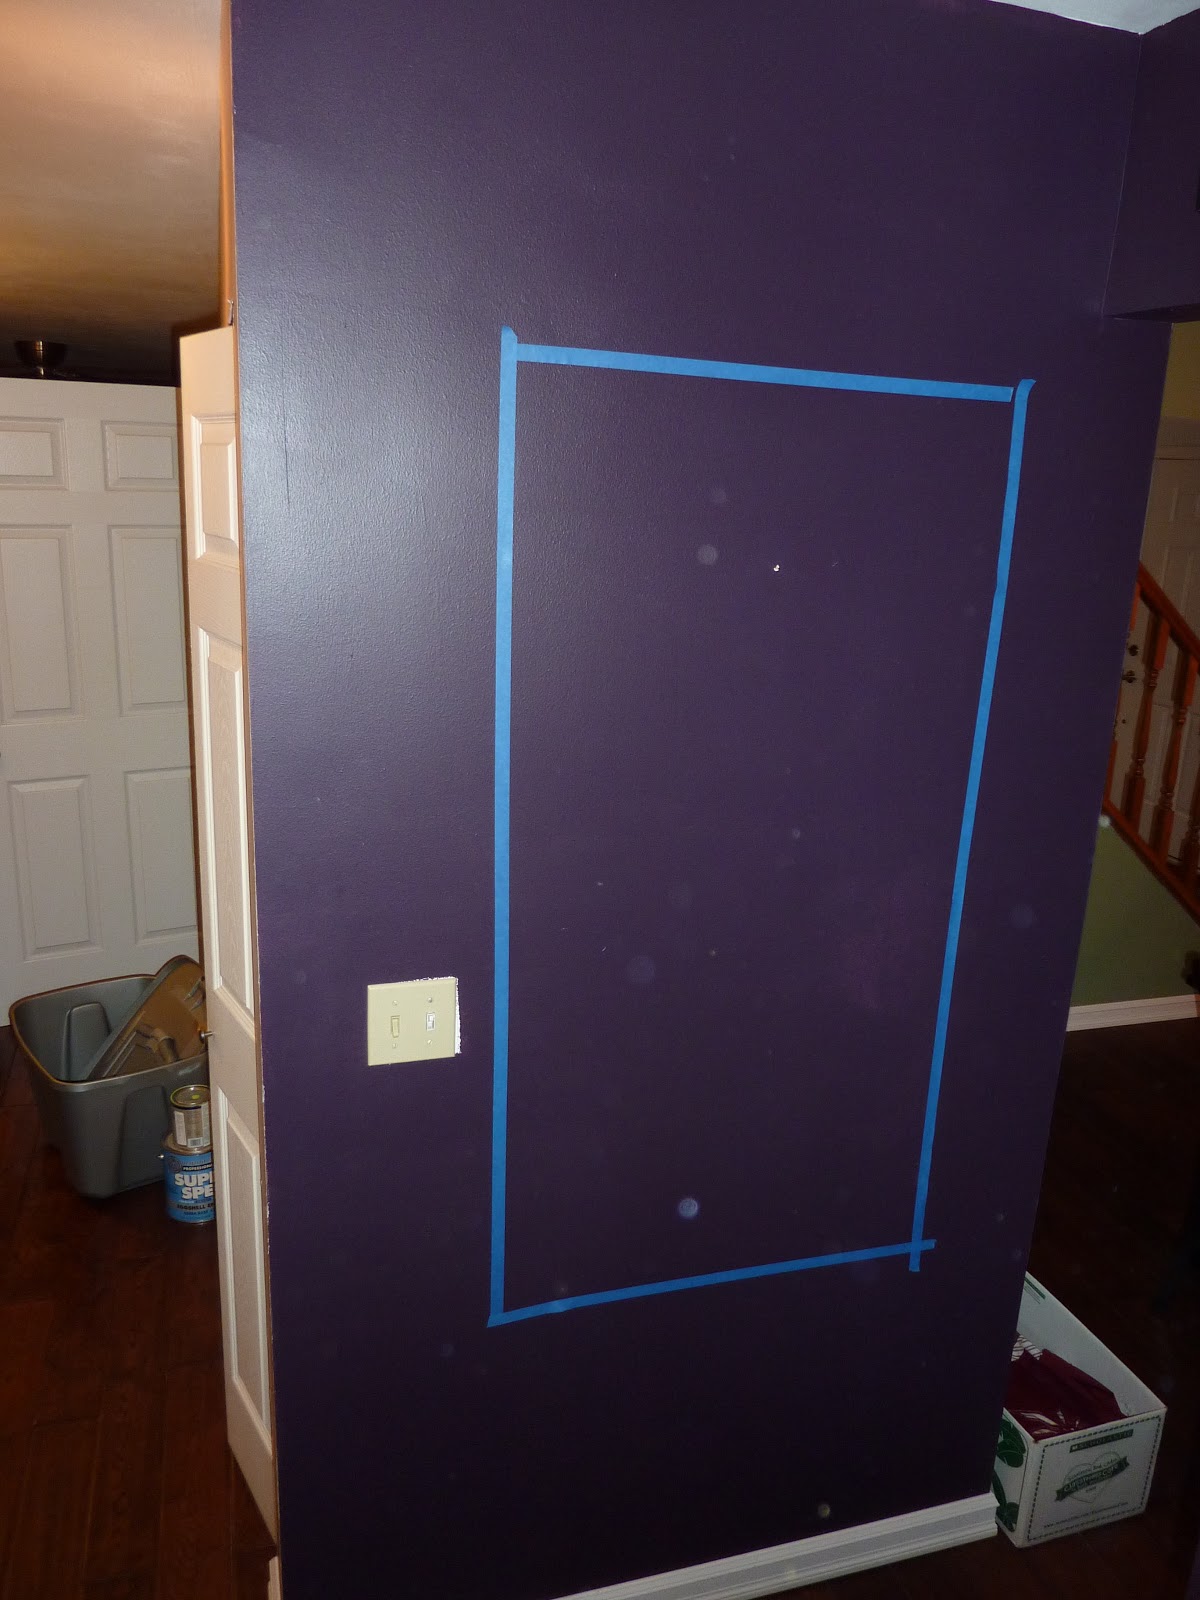
Mark the general area that you would like the chalkboard to be. Use a plumb line and level to ensure that your lines are straight. Use painters tape to mark the boundary of the area you will paint. Using a tape measure, make sure that your heights and widths are equal for the top/bottom and side/side.

Marking the general dimensions


Using the Plumb line 

Step Two: Painting your chalkboard
Gather your painting supplies and get ready to mix!  Add 2 tablespoons of Tile Grout for each cup of paint. If you use White Tile Grout, your paint color will not change. Mix well, it will be grainy, but it should be well mixed. Paint! I did 3 coats of paint because I was nervous about what would work best. I think 3 was good coverage and provided a great chalkboard. To start I made one batch of paint/grout (1 cup/2 tbsp) and that lasted almost 3 full coats. I had to add a little paint and grout to finish the bottom 1/4 of the last coat. I didn't perfectly measure it out, I just added some paint  and some grout.


Paint Supplies
 Step Three: Priming the chalkboard surface
When the paint is dry, you will sand the entire surface. 150 grit was recommended, but I didn't have that, so I used 100 grit and it worked well. I was nervous that my sandpaper was taking off the paint--see picture--and if that would be a problem, but it was fine.This part is messy! I sanded until every part had been sanded well once and there were scratches all over the board. I sanded in various motions, as well.  Next, use chalk to completely cover the board. This is supposed to "prime" the chalkboard for all of your later drawings. I used the side of the chalk and rolled it over the entire board.  Last, use a wet  rag to gently clean the surface. I had read to use a "slightly damp rag," but that wasn't getting the chalk off. I found that a pretty wet rag cleaned better and didn't have any negative effects on the chalkboard.

Sanding the surface

Sanded and scratched up chalkboard surface

Priming with chalk

All cleaned off and ready to draw!
Step Four: Framing your chalkboard
You'll need to choose the type of trim you want, which I found was the most difficult part. I used three of the same pieces to frame the top and sides. I cut the trim to the correct length and nailed the trim into the wall. Tom and I tag-teamed on this part. It was nice to have someone hold the level and trim, while another person nailed. I wanted to have a ledge for the chalk to sit for easy chalkboard use, so I used a different piece of trim for the bottom. This worked very well. Tom used his carpentry magic (and a little bit of wood glue) to add those little corner pieces-Good work Tom!

Regular trim is up!

Adding the ledge
Gluing on the small corner piece

The finished corner

The finished chalkboard
Step Five: Draw
Enjoy your chalkboard! I'm really pleased with how mine turned out.

If you try creating your own chalkboard, or have already tried one, give me your tips! Happy Chalking!

Thursday, June 7, 2012

Introducing our Family

I thought I would provide a little background on the Ganz Family. There are 3 Ganz' who live here in Nantucket and we have a pretty simple life. Here are some descriptions of us (in no particular order):

Tom: husband, Bio Ethics Graduate Certificate holder, fisherman, Medical Student, cook, future OB-GYN, self taught handy-man, uncle, puppy dad, P90X exerciser, outdoorsman, dedicated study-er, son, hard worker, hunter, closet FRIENDS watcher, brother, reader, friend

Becoming a Doctor!

Natalie: wife, First Grade Teacher, overly enthusiastic reader, analytical movie watcher, aunt, crafter, stays-at-work-too-long worker, summer lover, daughter, runner, Reading Specialist Masters degree holder, obsessive FRIENDS watcher, outdoors enjoyer, puppy mom, tutor, sister, friend

Sporting my Teacher of the Year gear!

Maggie: dog, puppy daughter, ball getter, swimmer, walker, bone chewer, cuddler, pathetic look giver, howler, player, cold weather lover

Swimming and relaxing in the heat!
We're glad to meet you!

Recipe: Bran Muffins

I'm trying really hard to make good choices [first grade teacher lingo] when it comes to healthy eating. I love food, but I don't love gaining weight from all the yummy eating!  So, I'm trying to commit to cooking and creating some healthy recipes. My inspiration came from a muffin mix from the back of a Baker's Corner (shout out to Aldi!) Dry Milk container, and then I make some adaptations. Here is my FIRST ever self-created healthy recipe:

Apple Bran Muffins 
(Let's be honest, bran just sounds disgusting, doesn't it? I was pleasantly surprised!) 

Ingredients:
1 cup wheat flour
1/3 cup brown sugar, packed
2 tsp baking powder
1/2 tsp salt
1/2 tsp cinnamon
1/4 tsp ground nutmeg
1 cup applesauce
3/4 cup water
1/2 cup instant nonfat dry milk
1/4 cup vegetable oil
1 large egg
2 cups bran cereal

Directions: 
Preheat oven to 400 degrees. Grease a 12 cup muffin pan or use paper liners. Combine all ingredients, except bran, into a bowl and mix well. Add the bran and stir until moistened. Spoon into prepared muffin cups, filling 2/3 full.

Bake for 12-15 minutes to until a toothpick inserted in the middle comes out clean. Remove from oven and allow to cool slightly. Serve warm.


Served  best warm with a *little* bit of butter. Cheers to healthy eating! Any ideas for further substitutions?

Sunday, June 3, 2012

BBQ Season

It is BBQ season and  I am hosting our annual Father's Day BBQ. I want to spruce up the backyard and bring our random furniture and pots together in a coordinated but not too matchy-matchy way. So, I thought I would paint all of our plant pots the same color--a bright apple green--that also would go with our indoor decor if I decide I need those pots inside one day. Here goes!

Here was my process:
Step One: Wash pots
Step Two: Gather Supplies

Spray Paint and amazing Spray Paint Can Sprayer...you got to have one of these!!

Step Three: Paint away!

Step Four: Re-plant pots

...and done!

I'm pleased with how they turned out. Not pleased that it took ALL day! I think we are one step closer to being BBQ-ready!

Joining the Ranks

 I figured it was time. Time for the Ganz Family to join the ranks and have a family blog. Tom has previously blogged on Medicine [Musings of a Medical Student], and Natalie has previously blogged on Education [Pedagogery]. But, we've yet to have a blog TOGETHER and write about our personal life. Really, we have never felt like we live exciting enough lives to merit a blog, but maybe something exciting will happen soon! Or maybe not. We did just get our puppy dog a pool...thrilling times we live in, here in Nantucket [to clarify: not the island of  Nantucket, our subdivision is called Nantucket]. For those of you who thought we lived in a beautiful beach-side east coast getaway, you are [sadly] very mistaken.

Our Nantucket Home

The Island of Nantucket
So there you have it. Our first post. I know your anticipation for future posts is growing already. And maybe now you want to go to the island of Nantucket? I know I do!